A weight distribution hitch (WDH) is one of the most important — and most misunderstood — pieces of towing equipment you can own. It’s not just for heavy trailers. If your truck’s nose lifts when you hitch up, or if your headlights are pointing at the sky, you need one. And if you have one but haven’t set it up correctly, you might be doing more harm than good.
This guide walks you through exactly how to set up a weight distribution hitch from scratch — the right way.
What Is a Weight Distribution Hitch?
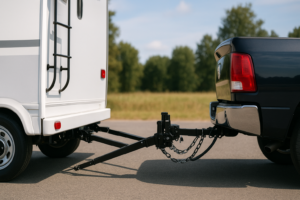
A weight distribution hitch uses spring bars under tension to redistribute a portion of the tongue weight from your truck’s rear axle forward to all four wheels of the tow vehicle. The result is a level, stable rig with restored steering and braking performance.
Without a WDH, excessive tongue weight causes the rear of your truck to squat, the front to lift, and your headlights to blind oncoming traffic. Steering becomes vague, braking distances increase, and you’re carrying more weight than your rear suspension was designed for on a single axle. If you want to understand why tongue weight matters so much, read our guide on how to load a trailer properly — correct loading is the foundation that makes WDH setup possible.
When Do You Need a Weight Distribution Hitch?
Most manufacturers recommend a weight distribution hitch when your trailer’s loaded tongue weight exceeds 10–12% of your truck’s rear axle weight rating — or when the trailer weighs more than 50% of your tow vehicle’s weight. Practically speaking:
- Trailer over 5,000 lbs loaded: strongly consider a WDH
- Trailer over 6,000–7,000 lbs: a WDH is typically required
- Any trailer where your truck nose lifts noticeably when hitched: use a WDH regardless of weight
- Many RV manufacturers void warranties if you tow without one above certain tongue weights
To correctly size your WDH, you need to know your actual tongue weight. See our full breakdown of towing capacity vs. payload capacity to understand why tongue weight counts against your truck’s payload — not just its towing rating.
Choosing the Right Weight Distribution Hitch
Weight distribution hitches are rated by tongue weight capacity — typically 600 lb, 1,000 lb, 1,200 lb, and 1,700 lb classes. Choose a hitch rated for at least your maximum loaded tongue weight with some headroom. Do not oversize dramatically — using a 1,700 lb WDH on a 400 lb tongue weight trailer will not distribute effectively and can damage your hitch head.
READY TO STOP GUESSING?
LEARN THE RIGHT WAY. TOW ANYTHING. FEAR NOTHING.
Tow with total confidence. 55 video lessons, one-time payment.
ENROLL NOWOne-time payment - 30-Day money-back guarantee
- Trunnion bar systems: Easier to adjust, better for heavier loads, common on brands like Reese and Blue Ox
- Round bar systems: More affordable, widely available, used on most entry-level WDH systems
- Sway control integrated: Many modern WDH systems include built-in sway control — look for friction sway or dual-cam designs if trailer sway is a concern
If trailer sway is something you’re worried about, read our dedicated guide on trailer sway control before you buy — the right WDH can address both issues at once.
How to Set Up a Weight Distribution Hitch: Step by Step
Step 1: Measure Your Truck’s Ride Height Before Hitching
Before attaching the trailer, measure the height of your truck’s front and rear bumpers from the ground. Write these numbers down — you’ll compare them after hitching to determine how much the truck is squatting.
Step 2: Attach the Trailer Without Spring Bars and Measure Again
Hook up the trailer coupler to the hitch ball and lock it. Do not attach the spring bars yet. Measure your bumper heights again. If the front bumper rose and the rear dropped compared to your baseline, your tongue weight is loading the rear axle — this is exactly what the WDH corrects.
Step 3: Set the Head Tilt Angle
The WDH head needs to be adjusted so the spring bars point slightly downward toward the trailer frame when unloaded. Most manufacturers specify about 3 degrees downward — check your specific hitch manual. This pre-load angle is critical: too little and you won’t distribute enough weight; too much and you’ll over-tension the bars.
Step 4: Attach and Tension the Spring Bars
With the head angle set, attach the spring bars to the hitch head and then to the trailer’s lift brackets. Use the lift handle or jack to raise the bars into the brackets under tension. You should feel significant resistance — you’re pre-loading the bars to redistribute weight forward.
Step 5: Measure Bumper Heights Again and Adjust
With the spring bars tensioned, measure your bumper heights one more time. Your goal: front bumper should return to within ½ inch of the unhitched measurement; rear bumper should rise back up compared to the loaded-but-no-WDH measurement. If the front bumper is still significantly lower than baseline, increase the head tilt angle. If the front is higher than baseline, decrease the angle.
Step 6: Verify the Trailer Is Level
Stand back and look at the truck-trailer combination from the side. The trailer should be either perfectly level or slightly nose-down (1–2 inches). A nose-up trailer creates aerodynamic drag and weight imbalance. Adjust your hitch ball mount rise or drop to achieve a level trailer before dialing in WDH tension.
Common Weight Distribution Hitch Setup Mistakes
- Setting tension by feel instead of measurement: Always use bumper height measurements — guessing leads to under- or over-tensioned bars
- Skipping the pre-hitch baseline measurement: Without baseline numbers, you have nothing to compare against
- Using a WDH that’s too large: An oversized WDH can transfer too much weight forward and lift the trailer axles, reducing trailer braking effectiveness
- Not adjusting for tongue weight changes: Every time your load changes significantly, re-verify your setup
- Forgetting to disengage before tight turns: Some WDH systems require you to release the spring bars before backing into a tight space — check your manual
WDH Setup Checklist Before Every Trip
- Spring bars fully seated in brackets and locked ✓
- Hitch ball properly torqued and coupler locked ✓
- Safety chains crossed and attached ✓
- Trailer level or slightly nose-down ✓
- Front bumper within ½ inch of baseline height ✓
- Sway control adjusted if applicable ✓
For the full pre-departure routine — including all the checks beyond the hitch — see our pre-trip towing checklist. And for help choosing the right hitch for your trailer in the first place, read our guide on how to choose a trailer hitch.
The Bottom Line
A weight distribution hitch properly set up is one of the single biggest safety improvements you can make to your towing setup. It restores steering geometry, reduces braking distances, levels your rig, and dramatically reduces the conditions that lead to trailer sway. The setup process takes about 20–30 minutes the first time — and less than a minute each time after that once you know your settings. For federal standards on trailer hitch and coupling systems, the NHTSA trailer towing guidelines provide the official safety benchmarks manufacturers design to.
Want to master every aspect of safe towing from hitch setup to backing down a boat ramp? The TowPro Academy towing course covers weight distribution, pre-trip inspections, driving techniques, and much more. One payment. Lifetime access. Built for everyday truck owners.
Frequently Asked Questions About Weight Distribution Hitch Setup
How do I know if I need a weight distribution hitch?
You likely need one if your trailer’s loaded tongue weight exceeds 10-12% of your truck’s rear axle rating, your trailer weighs more than 50% of your tow vehicle’s weight, or your truck’s nose visibly lifts when you hitch up.
How long does it take to set up a weight distribution hitch?
The full setup process, including baseline measurements and tensioning the spring bars, takes about 20 to 30 minutes the first time. Once you know your settings, it takes less than a minute on every trip after that.
What’s the most common weight distribution hitch setup mistake?
Setting spring bar tension by feel instead of by measuring bumper heights before and after hitching. Skipping the baseline measurement means you have nothing to compare against, which leads to under- or over-tensioned bars.
How do I know if my weight distribution hitch is properly adjusted?
Measure your truck’s bumper heights unhitched, then hitched without spring bars, then hitched with spring bars tensioned. Your front bumper should return to within about half an inch of its unhitched height, and the trailer itself should sit level or very slightly nose-down.
Related Articles
- What Is Tongue Weight?
- Trailer Sway Control Guide
- How to Load a Trailer Properly
- How to Choose a Trailer Hitch
- Towing Glossary: Every Key Towing Term Defined
Ready to Tow With Confidence?
TowPro Academy is a Class C towing course built for truck owners who tow their own trailers. 55 lessons covering everything from hookup to backing up — one-time payment, learn at your own pace.
Start the Course — $50 One-Time📖 New to towing? Start with our structured Beginner Towing Guide — organized from basics to advanced, all in one place.
Stop guessing. Start towing with confidence.
The TowPro Course walks you through every skill in real road scenarios.
Step-by-step video instruction, towing calculators, and a printable checklist — everything in one place for $50.
Enroll Now — $50 →Read Next
- What Is a Weight Distribution Hitch?
- What Is Tongue Weight?
- Trailer Sway Control
- Towing Capacity Guide
- Full Towing Glossary
FREE DOWNLOAD
The Towing Safety Checklist Every Tower Needs
Stop guessing. Use this exact pre-trip checklist to stay safe every time you hitch up. Download it free — no experience required.
⬇ Get My Free ChecklistFree PDF · No spam, ever · Unsubscribe any time
RELATED ARTICLES
- ›Night Towing: Tips and Techniques for Safe After-Dark Driving
- ›How to Buy a Used Trailer: What to Look For Before You Commit
- ›Towing Laws by State: What Every Driver Needs to Know
- ›Trailer Maintenance Schedule: What to Inspect, When, and Why
Ready to put it all together? Enroll in TowPro Academy and master safe towing in 55 step-by-step lessons.
Related Articles


FREE DOWNLOAD
Never Miss a Safety Check Again
The exact 66-point checklist Jeff uses on every tow, so small problems get caught before they become breakdowns. Free and printable, zero guesswork.
✅ Get the Free Checklist